Showing posts with label Hinge Method. Show all posts

Monday, August 31, 2015

My Pineapple Log Cabin Quilt and Other Finishes

In April I took a class in making the Pineapple Block that was put on by Johanna Masko.  Our local guild invited her to be our guest quilter during our annual Quilt Show.  She put on three classes over the weekend.  She was making a block to make a cushion but I thought I would practice making the block and made 12 blocks to make a small quilt.  


Pineapple Log Cabin Quilt

The fabric was purchased in England and is made up of The Union Jack and other symbols of the United Kingdom.  There are Bobbie's, taxi cabs, crowns, pay phone booths, double decker buses and assorted landmarks all throughout the fabric.  I added a few of the assorted blues and reds but the theme fabrics are truly English.

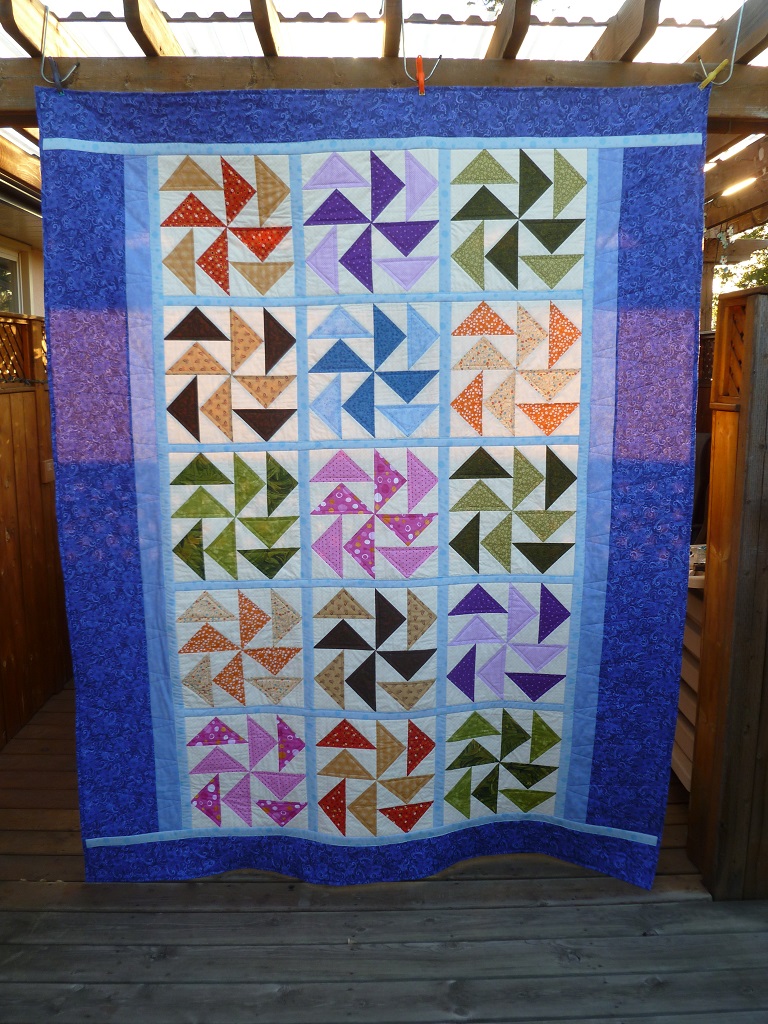
Amazing Jelly Roll Quilt

This pattern is from the 3 Dudes and broken down by Missouri Star Quilt Company.  You take 4 strips and sew them together, measure the width of the strip and cut the strip into squares.  Take one and place it horizontal on your cutting board and place a different or same square vertically on top, sew all around the outside and cut it diagonally from corner to corner twice.  
I made one square and got hooked and before I knew it I had made 12.  I used the hinge method to put the squares together.  It is a quilt as you go method and goes together really quick.  It was completely made with scraps.

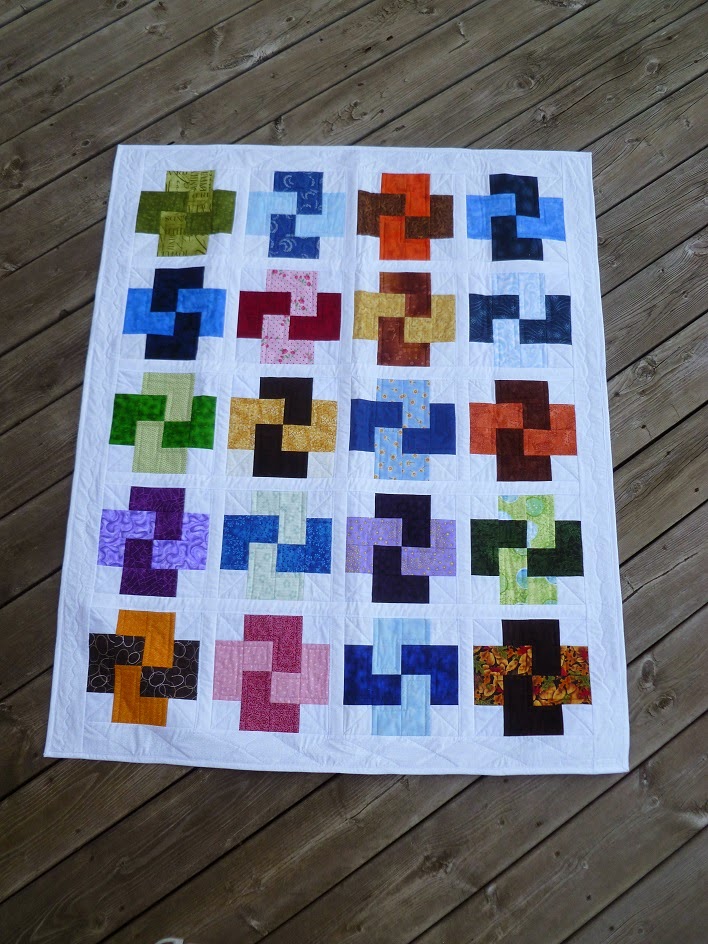
Floating Four Patch Quilt

I got this pattern idea from The Gourmet Quilter.  She was using up some scraps so I did the same and made a scrappy floating four patch quilt. This quilt measures 38 x 52 just the right size for a lap quilt for one of the Homes for the Aged.


Two Block Kid's Quilt

Strange as it may seem, that is the name of this quilt.  I got the pattern from All People Quilt when I was looking for a pattern for a child's quilt.  It was so easy just to use large square of assorted children's fabric that I had on hand and just added the coloured sashing.

Peggy


Monday, July 27, 2015

Here it is

I finished the binding on the Hinge Method quilt and I decided to name Double Flavoured Quilt because of the bright colours that remind me of sweet treats.  


 Double Flavoured Quilt

The side borders are larger than the top and bottom because I used 15 squares and not the usual 12 so it was a lot longer than it was wide.  It is 68 x 85 inches and very large for me to work on.  I think it will be a long time before I make another one.  I will help the guild make hinge quilts but I won't be making one myself.

Peggy

Sunday, July 26, 2015

Whoot, Whoot

I have had a very busy month this July.  I was away on a quilt retreat at Hawkeye Lake again this year but forgot to take pictures.  I made 6 quilt tops on retreat.  Two of them will be Teddy Bear quilts and the others are children's quilts for a group called "Precious Bundles".  The guild supplies them with children or baby quilts to give to the less fortunate.

I also went on a fishing trip up to Lake of the Woods.  We didn't get our limit of 12 fish but we caught 10 and had a great fish fry.

Today I finished the Hinge quilt.  Whoot, whoot.  I was really not looking forward to putting the borders on this quilt as it finishes at 68 x 80 inches.  I very large quilt for me to make.  I just have to add the binding and then I will take a final picture.  I bought myself a treat of a new sewing machine and that is what made the task so easy.  It paid for itself today.  It is a Janome 8900 and just a gem.  I think I am really going to enjoy this new machine and to put it through it's paces.  Looking forward to getting to know it.

Peggy

Sunday, July 12, 2015

Seven New Blocks

Our Guild is going to make some bed size quilts for an organization here for troubled youth.  I decided to make one using the hinge method since a large quilt is too big to quilt on my machine and using the hinge method you quilt the blocks first and then hinge them together to make a quilt.  I am still working on it and hope to have it finished by September.  

It looks a little weird because I still have to add borders and it is long and skinny, but it will look fine when the borders are on.  They are all quilted and ready to be added, I just have to get around to doing it.  The problem is that the quilt is still very large to maneuver around so I have to psyche myself up for it.

The guild has taken my idea and asked the members to make blocks that we can hinge together at a Quilt Bee in the fall, so I decided to make a few.  Once I get started I can't seem to stop.  I ended up making seven.   They were to be 12 1/2 inch squares but leave an edge all around them so that they can be squared up when it is time to quilt them.


Two inch squares

Three and a half inch squares.


Five nine patch blocks.  I tried to get a little creative with different colours and arrangements.

Peggy


Saturday, April 11, 2015

We hope to do a little bit of remodeling at camp this year so I thought I would make a new quilt.  I have made this one before and decided to change it up this time around.  It is called Cabin By The Lake designed by Leanne Anderson of the Whole Country Caboodle.  I used the Hinge Method to put the panels together and also when I added the border.  I also left off one of the borders.  I didn't want it as large as the pattern called for.  Also I was running out of fabric.

Adding the border with the hinge attached to the main body of the quilt.


I was trying to decide what to use for the border.  These were the two fabrics that I had the most of since this was my second quilt using the same fabric.

The finished product.
It was a beautiful day today, 17 C, so I decided to take a picture by hanging it up outside in the beautiful sunshine.  Spring might be on it's way.


I also finished another door hanging from Country Junk'tion.  I made all 12 of them a few years ago but did not quilt them so they could be hung on the door.  I have decided that I better get them finished so that I can enjoy them.


Peggy

Sunday, December 21, 2014

Busy with Scraps

Two more scrap quilts are finished.

This is called "Step in Time".  

I made it with 2 1/2 x 4 1/2 inch strips.
The pattern is found here although the author used charm squares and I used scraps.  When ever I see a quilt made with charm packs I think scraps. 

I called this one "Spinners"

I used 5 inch squares to make half square triangles and squared them up to 4 1/2 inches and then I sewed 4 of them together to make a larger square, then used the hinge method to sew them together.

With this method you quilt the squares first and then hinge them together with sashing strips on the top and bottom of the quilt.

Peggy

Friday, November 14, 2014

Hinge Method Demo

This is a technique that Jackie Black from our Guild developed to make it easier to put a large quilt together.  The squares are quilted first and then hinged together by the sashing strips.  I took the course last May from Jackie and a few of the gals missed the class so I said that I would teach it through the guild if there is enough interest.  I have made three quilts using this technique and I really like it since I find it hard to maneuver a large quilt while quilting it.

I am in the middle of putting a baby quilt together for my oldest sister Carole and am waiting for more fabric to arrive in the mail so I have been working on my demo so that I can explain the technique and show how it is done.


I quilted this block and then sewed the hinge on the front 
and lined it up with the hinge on the back.  You can see the blue
backing peeking out at the top of the block.  
I always make my hinges larger than my block
and then trim them down after they are
attached.
This is a 3 inch sashing strip folded in half so the cut edge is hidden.

You can see that I left a 1/4 inch rim of batting and backing
around my square.
I wanted my quilt to grow and this will add a 1/2 inch to each row.

This block has its mate zigzagged to it and ready to 
have the hinge sewn down on the adjoining block.

Click on the picture to see it clearly.

Here I have 3 blocks hinged together.
I zigzagged the hinge onto the adjoining block.
You could use a fancy joining stitch but I just used a zigzag stitch.

Now I am joining 2 rows together.
I matched my hinges so that the sashing will be in a 
straight line, then I zigzagged the 2 rows together.

This is the back of the quilt.  If you click on the picture 
to enlarge it you can see the hinges on the back of the quilt,
and the long hinge to join the rows together.

Since the rows can be long and it is sometimes difficult to sew
on the top hinge and catch the back hinge in the stitching
I usually put some "Heat and Bond" (that is the white strip you see here) on the back
hinge and press it down so that it stays in place
and will be caught in the upper stitching.

This quilt may never be finished as a quilt but it makes a great demo to explain the technique.

Peggy.


Saturday, October 25, 2014

Hexagons and More

I made one of these quilts last year and I cut the fabric for this quilt this past summer while I was at the cabin.  These are so neat because you cut half hexagons and match them up to make whole hexagons.

Hexagon Quilt.

I added half white hexagons along two sides and quarter hexagons on the other sides.  Then I decided that I needed a small border on 2 sides only.  I think it is about 38 x 49 inches.  It looks square but it isn't.  Lots of scraps where used in this quilt.


I found this quilt out in cyberspace at the Linus connection and thought that it would make a great scrap quilt, except that the squares were suppose to be 16 inches.  I divided the pieces in half and made 8 1/2 inch squares.  I had to make more squares but I had lots of scraps so it didn't matter.  This quilt is also on Craftsy.  

I have been concentrating on lap quilts about 38 x 50 inches since these are easier for me to quilt.  I have made a few larger ones and since I now know how to use the hinge method I may make them a bit larger.  Dee's Brick Trick was made using the hinge method.  When using this method you can add the borders to your quilt after the quilt is made.  This is great when you finish the quilt and decide that it should be larger so you can add a few borders to accomplish this.  


When I first thought I would make this quilt I chose forty-eight 5 inch squares because I needed forty-eight half square triangles.  After I had them all made I realized that I only needed 24 - 5 inch squares, so now I have another 48 half square triangles that I can use to make another quilt.  I will have to try something different for the next quilt.  I will have to study some patterns and come up with a different quilt.  I may have to add a few since there is a lot of white in this quilt.  

There are so many ideas on Missouri Star Quilt Company if you ever have trouble trying to decide what to make all you have to do is look at a few of the videos.  When she talks charm squares I immediately think scraps.

Peggy.


Sunday, August 10, 2014

Two Inch Squares

I have been cutting so many scraps lately I thought I should make something out of some of them.  I decided to use some 2 inch ones to make a donation quilt.  I used a 16 patch block so that I would use a lot of the squares and make a decent sized block.


There are 560 - 2 inch squares in this quilt.

I finished this quilt using the hinge method so that it was easier to quilt.
I still have about the same number of 2 inch squares in my bin.  I guess I will be making another one soon.  I think I will look for a different pattern or use a disappearing 16 patch.  That is a neat pattern.

I found this pretty butterfly fabric at "The Circle of Friends" quilt shop.
Cora's quilt needed a bag to go with it and I thought it was great since it has so much pink in it.  I put a tab across the top instead of a zipper and found a large pink button.

Peggy

Sunday, June 1, 2014

Disappearing 4 patch

This pattern was on my bucket list, to make a quilt using a disappearing four patch.  I used scraps from my stash that I had collected over the years so nothing goes together they were just random pieces that were the right size.  The white was the only thing that was consistent.

This pattern is a little trickier than you might think just by looking at it.  You put 2 coloured squares and 2 white squares together in a 4 patch and them cut them apart one inch from the center on all 4 sides.  That is what forms the little tiny 4 patch in the center of the blocks.  When you are cutting them apart you have to be sure to have them always the same direction or they don't turn out the same.  So it means having a white square on the left or a coloured square on the left and being consistent.  There is one square in this quilt that is different from all the rest.  If you go to Missouri Star Quilt Company Jenny has a great tutorial on this pattern.

After I finished this quilt it was 38 x 46 and I thought it should be bigger.  I had already quilted it and was about to put the binding on it when I decided that it needed a few more inches.  I used Jackie Black's method of adding borders that she taught us when she did the hinge workshop. 

 I am really thrilled to learn how to do this so that I can enlarge a quilt if I want to.
Peggy

Sunday, May 25, 2014

The Hinge Method Continued

I finished putting the binding on my Hinge Method Quilt and the weather was so beautiful I hung it up and took a picture of it.


There was a slight breeze but it turned out pretty good.
The temperature today was 28 C so I had to wait till the sun reached the west so that there was no shadow on the quilt.
I am really pleased with the way this all turned out and thankful for the learning experience.

I also finished 2 bags for the twin quilts I made for Joanne's twin grandsons.  Since the quilts are identical except for the backing, I made the bags to match the backing.  So one is green and the other blue.
I thought the humpty dumpty fabric was so cute for two 4 year old boys.

I like to put the quilts in bags because then the quilts can be stored in the bags or the bags can be used for toys.

Peggy


Wednesday, May 21, 2014

The Hinge Method Workshop

The day before I left for Ottawa I took a class from Jackie Black who has developed a new method of joining squares together.  The completed squares are quilted and then joined together with sashing strips.  She calls it the Hinge Method.

Add sashing to the front and back of the strip.  I used a 1/2 inch seam allowance so that I wouldn't lose my points in my blocks.

After that zig zag the 2 blocks together.

Sew the hinge to the second block.  I sewed the hinge with a straight stitch although it could also be sewn with a fancy stitch.  You have to catch the hinge on the backing side and sometimes this is easier with a fancy stitch or a zig zag stitch.

Two finished quilts from the class.

My finished quilt with hinges joining the squares together and borders added.  This quilt was one of my BOM's that I did last year from "In Color Order"

One really exciting thing that I took away from this class is how to add borders to an already quilted quilt.  

So the next time I finish quilting a quilt and haven't added the binding but decide that I would like to make it larger I know how to add another border.

Peggy